This is the third part of my beehive helmet series, in which I describe how I'm reconstructing a Minoan helmet like this one from Phaistos. In part two, I talked about how I made the inside of the helmet. This post deals with the outer layer.
The outside of the helmet is made from four horizontal bands of leather, joined together with what are probably strips of felt. Since the helmet is shaped, these leather bands have to be shaped too. I can't really provide a pattern like I did for the internal structure, because the external layer's shape and dimensions depend on the internal support and will therefore be slightly different for every helmet.
Band 1 is simply a strip of leather 50mm wide and long enough to go around the helmet plus about 50mm.
Band 2 is also a strip of leather 50mm wide, but it has been stretched until it has a slight curve. It started out 30mm longer than the circumference of the helmet, and after stretching the bottom edge of band 2 is 20mm longer than the top edge. It's not much, but it's enough.
Band 3 has more of a curve than I could achieve just by stretching the leather. I could do it with thinner leather, but this stuff is thick and tough. Therefore, I made a pattern by taping a piece of paper around the top of the helmet and drawing the band. Once I cut the paper, I had a pattern I could use to cut out my leather.
Band 4 is a circle 120mm in diameter with a 50mm hole cut out of the centre. It is shaped into a shallow cone.
To shape the leather, I gave it a really good soak in hot water until it was thoroughly saturated (this takes an hour or so), then moulded and stretched it until it fit over the inner helmet. I kept that dry by wrapping it in clingfilm. No it's not historically accurate, but it gets the job done. The inner helmet is nowhere hear rigid enough to be used as a mould for shaping the outer bands, so I just used my hands to shape bands 1 through 3, and found a wine bottle worked well for shaping band 4. Maybe the Minoans used wine jars too.
Soaking the leather makes it a lot softer, but with leather this thick it still takes a little patience and a lot of brute force to shape the pieces. The same goes for piercing holes to stitch the leather bands together and attach metal studs, which I'll discuss in more depth in the next post.
There are no words to describe how sick I am of making awl holes in armour leather.
The easiest way to do it is to soak the leather and then heat the awl over a candle, which I suspect was how the Minoans did it, but "easiest" is a relative term in this context. It must have been even more difficult in the Bronze Age, because steel tools were not yet available. The tools they had didn't hold an edge the way steel tools do.
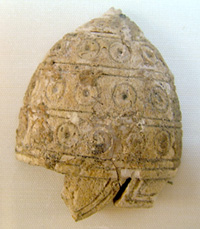 |
| Picture from the Salimbeti website |
The outside of the helmet is made from four horizontal bands of leather, joined together with what are probably strips of felt. Since the helmet is shaped, these leather bands have to be shaped too. I can't really provide a pattern like I did for the internal structure, because the external layer's shape and dimensions depend on the internal support and will therefore be slightly different for every helmet.
 |
| Bands 1 to 4, clockwise from left. |
Band 1 is simply a strip of leather 50mm wide and long enough to go around the helmet plus about 50mm.
Band 2 is also a strip of leather 50mm wide, but it has been stretched until it has a slight curve. It started out 30mm longer than the circumference of the helmet, and after stretching the bottom edge of band 2 is 20mm longer than the top edge. It's not much, but it's enough.
Band 3 has more of a curve than I could achieve just by stretching the leather. I could do it with thinner leather, but this stuff is thick and tough. Therefore, I made a pattern by taping a piece of paper around the top of the helmet and drawing the band. Once I cut the paper, I had a pattern I could use to cut out my leather.
 |
| Piece of paper wrapped around the helmet, with the shape of band 3 drawn on. |
 |
| Pattern for band 3. |
Band 4 is a circle 120mm in diameter with a 50mm hole cut out of the centre. It is shaped into a shallow cone.
To shape the leather, I gave it a really good soak in hot water until it was thoroughly saturated (this takes an hour or so), then moulded and stretched it until it fit over the inner helmet. I kept that dry by wrapping it in clingfilm. No it's not historically accurate, but it gets the job done. The inner helmet is nowhere hear rigid enough to be used as a mould for shaping the outer bands, so I just used my hands to shape bands 1 through 3, and found a wine bottle worked well for shaping band 4. Maybe the Minoans used wine jars too.
Soaking the leather makes it a lot softer, but with leather this thick it still takes a little patience and a lot of brute force to shape the pieces. The same goes for piercing holes to stitch the leather bands together and attach metal studs, which I'll discuss in more depth in the next post.
There are no words to describe how sick I am of making awl holes in armour leather.
The easiest way to do it is to soak the leather and then heat the awl over a candle, which I suspect was how the Minoans did it, but "easiest" is a relative term in this context. It must have been even more difficult in the Bronze Age, because steel tools were not yet available. The tools they had didn't hold an edge the way steel tools do.
That sounds like a lot of hard work! I'm really looking forward to seeing the finished product.
ReplyDeleteI'm looking forward to seeing the finished product too. It is a lot of work. I'd estimate those outer bands take 2 hours each to make, from cutting them out through to hammering in the reinforcement studs. One of the things I find so interesting about these historical projects is that doing it the way the ancients would have done, and seeing how long it takes and how much work actually goes into these things, really gives me a new appreciation for the people and the things they achieved.
Delete