Monday, 5 December 2016

Commemorating 500 years of the Reinheitsgebot

2016 has been an eventful year, and at this point the one thing I think most of us can agree on is that we could do with a beer.  With that in mind, I'm sharing my recipe for traditional Bavarian style wheat beer.  I've been perfecting the recipe this year to commemorate the 500th anniversary of the Reinheitsgebot.


The Reinheitsgebot ("purity order" in German) is a piece of legislation adopted in Bavaria in 1516 that regulated what ingredients could be used in beer.  To some extent it was health and safety legislation, because in 1516 preventing beer from going off was a serious problem.  Brewers experimented with various additives in an attempt to increase their beers' shelf life, and unfortunately these additives were sometimes toxic.

The Reinheitsgebot stayed in force until 1987, when the EU rightly determined that it was an objectionable barrier to free trade, but its legacy still dominates the global beer market.  Most German beer is still brewed according to the Reinheitsgebot's specifications, and even here in Australasia most commercially produced beer complies with the purity order.  It has become part of the German beer tradition.

Originally the law required beer to contain only barley, water, and hops*, but German beer drinkers quickly found this list was too restrictive.  It effectively outlawed a number of traditional German beer styles that used different ingredients, including wheat beer.  So the list of permitted ingredients was expanded, and the first exception to be made was wheat.

My wheat beer recipe is a traditional Bavarian style, and doesn't comply with any version of the purity law because it contains honey and spices.  It isn't a historical recipe, in fact it's an extract recipe** rather than an all-grain recipe, but it tastes great.  It's a bold, full flavoured wheat beer with citrus top notes and smokey, honeyed undertones.

Ingredients

1.7 kg wheat liquid malt extract.  I use Mangrove Jack's Bavarian wheat, which already contains hops and has a packet of yeast under the lid so I do not need to buy these ingredients separately.
1 kg wheat beer enhancer
3 tbsp honey (approximately)
1 tsp coriander seeds, crushed slightly between your fingers to break them open
½ tsp ground nutmeg
½ tsp ground cloves

1 pack of carbonation drops for bottling – these are optional.  You can just use sugar or glucose syrup, but the carbonation drops are easier and more convenient.  I recommend them.

This recipe will give you 23 liters of beer, or 6 US gallons.

Instructions

The secret to brewing good beer with malt extract is to ignore the instructions on the side of the malt tin.  Instead, bring 3 liters of water to the boil, then add malt, beer enhancer, and spices.  Stir until everything is completely dissolved.  Boil the wort, stirring regularly, until the protein break occurs and foamy white stuff starts to form on the surface.  Once the protein break has occurred you can take the pot off the heat and leave it to cool for a while.

While the wort cools you can clean and assemble your fermentation bucket, and re-hydrate the packet of yeast that came with the malt extract by putting it in a bowl of warm water with a little sugar.  Pour four or five liters of cold water into the fermentation bucket, then add the wort.  Add more cold water until you have 23 liters of wort in the fermentation bucket.

Pitch the yeast when the wort reaches somewhere around 20 degrees Celsius  (18 to 23 degrees is apparently the optimal temperature range for ale yeasts), and ferment the stuff for two weeks.   I find fermentation can be a little slow to start with this recipe, but it should start within 12 hours.  As long as there's a kraeuzen on the top it'll be fine.

After two weeks the beer is ready to be bottled, and it should be conditioned in the bottles for at least two weeks.  Four weeks, however, is ideal.  If you drink it earlier it's likely to taste slightly "green".


*  Remember, this was over 300 years before Louis Pasteur.  They did not yet understand the role yeast plays in fermentation.
**  At some point in the future I'll do a post on the history of malt extracts.  It's more interesting than you might expect.

Sunday, 21 August 2016

Homeric kykeon

Kykeon (κυκεών in Greek) is a drink made from barley, herbs, and sometimes wine.  It was a popular everyday drink in Classical Greece, although it was considered a bit low-class.  There are a couple of different recipes for kykeon in ancient Greek texts, because it was mentioned in Greek mythology.  

This is undoubtedly one of the weirdest things I've ever consumed.  What's that white stuff in it, you ask?  Grated cheese, of course.


Kykeon made with barley and pennyroyal was a central component of the Eleusinian mysteries.  According to mythology the goddess Demeter consumed this drink to ease her grief at losing her daughter; pennyroyal can be used as a mild sedative.  During the Eleusinian religious festival humans consumed kykeon as part of the initiation process.  This kykeon obviously had some special additives not usually present in everyday versions of the drink, because the Eleusinian initiates' experiences show that it was psychoactive.  It's often suggested that Eleusinian kykeon may have contained ergot, but there are other psychoactive ingredients that were available in ancient Greece and could have been used.  

In the Iliad 
(XI, 638–641and the Odysssey (X, 234), kykeon was made with wine and grated goat cheese as well as barley.  In the Iliad kykeon is served to Nestor and his companions, and in the Odyssey Circe gives it to Odysseus' men.  Of course, Circe's kykeon contains a drug which incapacitates the sailors and allows her to turn them into boars.  Some scholars probably interpret Circe's potion as a hallucinogen, but personally I don't see a need to rationalise the story into something that could have actually happened.

My kykeon is the Homeric kind, made with wine, and it most definitely doesn't contain ergot.  I like to think I'm a reasonably adventurous eater, but I have my limits.  

People who have made kykeon attest that the way to do it is to put all the ingredients in a pot and stir them together over a heat source, so that's what I did.  I cooked wine and barley flour on a low heat until the mixture thickened up, then I grated goat cheese over the top.  The cheese didn't melt, because goats' milk has a different protein structure to cows' milk and won't melt no matter what you do with it, but it did break apart into particles that mixed in with the kykeon.

The result was surprisingly palatable.  It smelled really good while it was cooking, and tasted mostly of wine with a little sweetness from the barley.  The grated cheese seems weird, but in fact it was quite good.


The Challenge: Myths and legends.


The Recipe: Wine and barley flour simmered together for 10 minutes, with grated cheese on top.

The Date/Year and Region: The Homeric epics were written down in the 8th or 7th century BCE, but they are set in the Late Bronze Age.  It's possible that the recipe dates back to the Late Bronze Age and I'm inclined to think it probably does, because the Iliad gives the recipe along with a very accurate and detailed description of Mycenaean furniture, but it's impossible to know for sure.

How Did You Make It: I put everything in a pot and simmered it for 10 minutes, stirring constantly.

Time to Complete: Ten minutes.

Total Cost: All the ingredients were ones I already had on hand in my kitchen.

How Successful Was It? While it's definitely a strange concoction by 21st century standards, it wasn't at all unpleasant. 

How Accurate Is It? I cheated by using an electric stove and stainless steel saucepan.  Other than that, I followed the recipe in the Iliad, but it's difficult to say how closely my kykeon resembles the original in terms of consistency and flavour.  The Homeric epics specifically state Pramnian wine was used to make kykeon, so I chose a rich, dark, relatively sweet wine (Peter Yealand's 2014 Merlot - it's a nice wine and I recommend it), because apparently that's what Pramnian wine was like.

Wednesday, 27 July 2016

A monochrome Delphos, colonial style

Leimomi of The Dreamstress spent the first two weeks of July living in 1916 (well, as close as it's possible to get).  If you haven't read her blog posts about it you should; go ahead, I'll wait.  On the 16th Leimomi was kind enough to invite a few of us Wellingtonians to a ladies' afternoon tea in 1916.

This meant I needed clothing suitable for 1916.

The obvious solution was the Delphos dress, created by Mariano Fortuny in 1909.  The Delphos has a number of attractive features from my perspective.  It's quick and easy to make.  It does not require any pattern drafting or fitting.  It does not require period underwear.  In fact it was meant to be worn with no underwear, which is still a bit risque a hundred years on and must have been downright scandalous in 1916, but it also works well with 2016 underwear.

By happy coincidence this month's Historical Sew Monthly theme is Monochrome, and I have some pleated black cotton in my stash, as well as white glass beads.  The original Delphos dresses were available in "black, gold, and the tones of old Venetian dyes", so black is quite appropriate for a 1916 Delphos.  In fact monochrome became rather fashionable during WWI, in response to dye shortages.


Monochrome Delphos in black cotton with white glass beads.


This isn't a very convincing replica of a real Delphos, because the fabric is quite different.  Delphos dresses were made of silk, whereas this is cotton.  However, it is entirely plausible that a kiwi woman who couldn't get a real Delphos would make an imitation like this one.  It's a very kiwi thing to do.  In the 19th and 20th centuries many things weren't available here in the colonies, and fashion-forward New Zealanders often had to improvise.  Eve Ebbet's book In True Colonial Fashion contains a particularly memorable account of a woman who made a bustle pad by stuffing her skirts with straw.  Unfortunately, the wind blew her skirt open and the straw was revealed.

The Delphos is a very simple thing, and very easy to make.  Fortuny patented the design, and the patent diagram shows how it was constructed.

Patent diagram for the original Delphos.


Item F on the diagram is a gathering cord under the arm, and this is the key to getting the sleeves to sit right.  There's also a gathering cord at the neck, which strengthens the neckline and allows it to be adjusted.


The Challenge: Monochrome.

Fabric: 3 meters of crinkled black cotton.

Pattern: There isn't one.  It's a tube.

Year:  Early 19-teens through 1920s.

Notions: Cords made from black crochet cotton, white glass beads, and a belt made from grosgrain ribbon with two thread buttons.

How historically accurate is it?  As a Delphos replica, 50% at best, but as an example of colonial ingenuity it's probably a  bit better.  The construction is certainly feasible for 1916 and is based on photos of Delphos dresses as well as the patent diagram.

Hours to complete: About 8.  The side seams are machined, but everything else is hand stitched; because of the way the dress is constructed, it really needs to be hand stitched.

First worn:  On the 16th of July, to Leimomi's afternoon tea in 1916.  It's a great dress and I want to make another one, in a shorter length.  The long, slightly-more-than-floor-length skirt is period, but it is also impractical.

Total cost:  I suspect the fabric cost something like $8/meter (everything came from stash and it's been there a while), and I have no idea what I paid for the beads.  So, maybe somewhere around $40.

Saturday, 23 April 2016

Mock food in the South Pacific

This fortnight's Historical Food Challenge is Mock Foods - "Historic cookbooks are full of recipes meant to imitate rare, expensive or impractical ingredients. It’s your turn to help your food pretend it’s something that it isn’t!"

New Zealand is geographically isolated.  Historically, many foods from overseas weren't available here, or were expensive.  That's still true to some extent, and it seemed appropriate to make a distinctly Kiwi entry for Mock Foods.  So what unobtainable delicacy will I be imitating in this blog post?  Turtle?  Caviar?  Nope.  This is New Zealand we're talking about here.  I'll be making imitation processed cheese.

Rex Luncheon Cheese was an Australian processed cheese product sold in cans.  Apparently it was popular but expensive, and it may have been difficult to get hold of in more isolated parts of the country.  So Kiwi housewives figured out how to make imitation Rex Cheese at home.


Advertisement for Rex Luncheon Cheese printed in The Age, 12 June 1925.


Recipes for imitation Rex Cheese began to appear in the 1920s.  This one is from The New Zealand Truth, 18 September 1930, and seems to be fairly representative of its type*.  It involves cheese, egg, vinegar, mustard, and cayenne pepper.  Advertisements described Rex Cheese as "piquant", which was apparently the product's point of difference and gave it a competitive edge over other canned cheese products.

The recipe is easy to make; you just put all the ingredients in a saucepan and stir until thick.  You have to stir constantly and vigorously, because it tends to curdle a bit like scrambled eggs.  This is actually the mixture starting to thicken up.  The "curds" are soft, and if you stir vigorously enough you'll get a thick and reasonably smooth consistency, but it looks like it's going to be a horrible disaster and it doesn't smell all that wonderful either.  I spent the whole cooking process looking at this stuff in horror and thinking "should it be doing that?  Ye gods, I think it is supposed to do that!"


Imitation Rex Luncheon Cheese.  I just love the gloriously artificial-looking orange colour.   In fact that's from the egg yolks, there's no colouring in there at all.


The recipe I used was intended as a filling for pastries, but the traditional way to serve imitation Rex Cheese is in cheese rolls.  These savoury snacks, sometimes called the sushi of the South, are a regional dish from Otago and Southland that you don't often see here in the North Island.  And that's a shame, because they are delicious in the way that only cheese-based junk food can be.  Of course, modern cheese roll recipes don't use imitation Rex Cheese.  They use a completely different cheese filling, and while I waited for my cheese rolls to toast I was uneasily aware that there might be a good reason for that.


Cheese rolls made with imitation Rex Luncheon Cheese.  They certainly look like they're made with processed cheese, but were they edible?  Read on to find out.


The Challenge: Mock Foods.

The Recipe: This one.

The Date/Year and Region: 1930s New Zealand.

How Did You Make It: As per the recipe.

Time to Complete:  25 minutes.

Total Cost: I didn't need to buy anything for this challenge because I already had the ingredients on hand.

How Successful Was It?  If there's one thing even less appealing than Depression-era canned cheese, it would have to be imitation Depression-era canned cheese.   But to my great surprise, the imitation Rex Cheese tasted okay.  It was cheesy and savoury and, yes, piquant.  It also held together and didn't ooze out of the cheese rolls when I toasted them, which was good.  In fact my only complaint is that the recipe has too much mustard.   If you make this recipe, I suggest you halve the amount of mustard.  In all honesty however, there are better cheese roll recipes out there.

How Accurate Is It? Well, I followed the recipe and I think it did turn out the way it was supposed to.   I'd love to know what Rex Cheese was really like and whether this recipe was a convincing imitation, but, sadly, Rex Luncheon Cheese is not available today.  The company that produced it no longer exists.

The consistency of my imitation cheese was more like a thick custard than any cheese product I've ever encountered, and I find it hard to believe the texture of this ersatz recipe was anything like the texture of real Rex Cheese, but then again we know Rex Cheese was spreadable and could be purchased in jars, so maybe this version isn't so far off after all.  Presumably the taste was at least reasonably similar.


* Although the recipe doesn't specifically mention Rex Cheese, its ingredients and preparation appear to be typical of imitation Rex Cheese recipes.  Compare it with this recipe provided by the Otago Daily Times, which was published in 1984 and is therefore ineligible for Historical Food Fortnightly challenges.

Friday, 18 March 2016

Sumerian beer

This Sumerian beer is made using a combination of fruit, malted grain, and bread.  It's very, very different from the kinds of beer we're familiar with today, but I found it surprisingly enjoyable.


Sumerian style beer, made according to the instructions in the Hymn to Ninkasi.


In my last post I discussed the Hymn to Ninkasi and what it tells us about Sumerian brewing practices.  I used the Hymn to develop a recipe for Sumerian style beer, and this is the result.

I won't lie to you: I didn't really expect this stuff to be very nice.  It has no carbonation at all, and no hops.  It also didn't get a secondary fermentation, which is usually an important part of the brewing process.  But this beer surprised me.  It isn't bad at all; in fact I like it.  It has a fresh, clean flavour and is pleasantly refreshing on a hot day after work.  The taste of barley comes through strongly and there are also distinct fruit flavours, but it's not very sweet and I think the different flavours are fairly well balanced.  The alcohol content is 4.5% by volume, so it's comparable to regular commercially produced beer in that respect.

I suggest serving this beer around 12 degrees C - cellar temperature, not chilled like a lager.

Even after filtering the beer through cheesecloth there is still a layer of sediment on the bottom of the bottle, which is visible in the picture.  Using a straw enables you to avoid the sediment layer and that, I suspect, is why the Sumerians drank their beer through straws.

Although I've tried to follow the Sumerian brewing process as far as possible, I have made some modern compromises.  I've used modern equipment because that's what I have in my kitchen, and a modern approach to sterilization because life's too short for bad homebrew.  You can get food poisoning from drinking bad brews.  I also added some dried bread yeast.  The Sumerians may have used the yeast that grows naturally on grape skins to ferment their beer, but I decided to use dried yeast rather than rely on the grapes, because who knows what's on the skins of supermarket grapes?


The Challenge: Juicy Fruits.  A combination of dates and grapes helps to give this beer a distinctive flavour.

The Recipe: Technically, this beer requires two recipes.

For the bappir (beer bread)

500 grams two row barley malt
A splash of date honey
Spices - I used a quarter teaspoon each of aniseed and cumin, both of which were used by the Sumerians.
Enough water to turn the ingredients into a stiff dough

Because of the barley husks the dough will not stick together very well, but that's okay.  Just do the best you can.  Shape the dough into a flat, round loaf on a pizza stone or baking tray; I recommend using baking paper.  The dough is baked twice, like biscotti.  I baked it for 30 minutes at 180 degrees C, then sliced it into strips and put it back in the oven (which I had turned off) to dry out.  It smelled great, but due to the presence of barley husks I wouldn't eat it unless I had to.

This is what the bappir looked like when it came out of the oven:


It did crumble a bit, but that's fine.  It has to be broken up for mashing anyway.


For 3 liters of Sumerian beer

Bappir from previous recipe
600 grams two row barley malt
Half a liter of date honey
A good handful of grapes
A teaspoon of bread yeast

I crumbled the bappir into a bowl, added the grain, and mashed them at 55 degrees C for 60 minutes.  Then I strained the mash and added date honey and grapes.  I pitched the yeast at 25 degrees C and let it ferment until the lack of bubbling noises indicated primary fermentation was over, then I bottled it.

I strongly recommend filtering the beer through a piece of cloth before bottling.

Note that my recipe only makes a small quantity.  You can of course scale it up to meet your requirements, but this stuff won't keep and should be consumed within a few days of brewing.

The Date/Year and Region: Southern Mesopotamia, c1800 BCE.

How Did You Make It: I developed the recipe based on the Hymn to Ninkasi.

Time to Complete:  About four hours' preparation time, plus three days to ferment.  Bear in mind though that most of that preparation time is just waiting for things to bake, or mash, or cool down enough to pitch the yeast.  The amount of actual, hands on work involved is fairly minimal.

Fermentation could take more or less time depending on the yeast and the environmental temperature, as with any beer.  It's ready to drink when you can't hear any more bubbling in the fermentation vessel.

Total Cost: $10.80.  This was a comparatively expensive beer recipe, because I had to buy dates.  Note however that although dates are expensive in New Zealand, they would have been cheap and readily available in ancient Mesopotamia.

How Successful Was It?  Much more successful than I thought it would be.  Because it's so different to the beers we're familiar with now it may be an acquired taste for modern beer drinkers, but I say put your expectations aside and give it a chance.

Leaving the barley husks in the bappir was a good idea, even though it made the dough difficult to mix and shape.  As I mentioned in the last post other people who have tried Sumerian beer have found that their mash stuck, but I didn't have that problem.  I think that was probably because of the barley husks.

How Accurate Is It? It's as accurate as I could get it based on my current understanding of Sumerian brewing.  To some extent I've had to make interpretations and use my best judgement, and the ingredients may not be exactly like the ones the Sumerians used.  Barley, for  instance, has probably changed a bit in the last 4000 years.  And, of course, I've used modern equipment.  But on the whole I think it's a fairly reasonable recreation of Sumerian beer.

I think this is a reasonable interpretation of the Hymn to Ninkasi, and one that fits the evidence we have about Sumerian brewing,  but other interpretations are possible and they are equally valid. 

Monday, 14 March 2016

Let's take a look at the Hymn to Ninkasi


The Hymn to Ninkasi, picture from Tulane University.  It was written around 1800 BCE by an unknown scribe.


Ninkasi was the Sumerian goddess of beer.  The Hymn to Ninkasi is not exactly a beer recipe in the modern sense, but in lines 13 to 48 it contains a fairly detailed description of the process by which Sumerians made beer four thousand years ago:
It is you who handle the ...... and dough with a big shovel, mixing, in a pit, the beerbread with sweet aromatics. Ninkasi, it is you who handle the ...... and dough with a big shovel, mixing, in a pit, the beerbread with sweet aromatics.
It is you who bake the beerbread in the big oven, and put in order the piles of hulled grain. Ninkasi, it is you who bake the beerbread in the big oven, and put in order the piles of hulled grain.
It is you who water the earth-covered malt; the noble dogs guard it even from the potentates (?). Ninkasi, it is you who water the earth-covered malt; the noble dogs guard it even from the potentates (?).
It is you who soak the malt in a jar; the waves rise, the waves fall. Ninkasi, it is you who soak the malt in a jar; the waves rise, the waves fall.
It is you who spread the cooked mash on large reed mats; coolness overcomes ....... Ninkasi, it is you who spread the cooked mash on large reed mats; coolness overcomes .......
It is you who hold with both hands the great sweetwort, brewing it with honey and wine. Ninkasi, it is you who hold with both hands the great sweetwort, brewing it with honey and wine.
1 line damaged
You ...... the sweetwort to the vessel. Ninkasi, ....... You ...... the sweetwort to the vessel.
You place the fermenting vat, which makes a pleasant sound, appropriately on top of a large collector vat. Ninkasi, you place the fermenting vat, which makes a pleasant sound, appropriately on top of a large collector vat.
It is you who pour out the filtered beer of the collector vat; it is like the onrush of the Tigris and the Euphrates. Ninkasi, it is you who pour out the filtered beer of the collector vat; it is like the onrush of the Tigris and the Euphrates.

- Translation by Miguel Civil available at the Electronic Text Corpus of Sumerian Literature, Oxford University.

Let's recap this process:

  1. Ninkasi bakes beer bread flavoured with aromatic herbs and/or spices.  This is a special type of bread called bappir which was used to make beer.  In 1800 BCE cuneiform it is denoted by a combination of the sign for beer and the sign for bread. 
  2. Ninkasi malts grain, and prepares an infusion mash.  
  3. She mixes wort with honey and wine, then ferments the resulting mixture.
  4. Finally, Ninkasi filters the fermented beer and then it's ready to drink.  This beer does not get a secondary fermentation like the beers we're familiar with today, and it doesn't get carbonated.

Unfortunately, the poem doesn't give any guidance as to how much of each ingredient should be used, so I will just have to guess the ingredient quantities.

Dates were probably one of the flavouring agents used to make bappir, and I would expect that some herbs and spices were included as well.  Ancient Mesopotamian people liked spiced food and the Sumerian recipes that survive tend to use multiple flavouring agents*.

I'm a little confused as to whether the grain used to make the bappir is supposed to be malted.  It's possible to make bread from malted grains and the malting process is necessary in order to release fermentable sugars from the grain.  The Hymn seems to imply the bappir has already been made by the time Ninkasi gets started on the malt, but there are scholars who think bappir was made from malted grains.  Perhaps it was made with an earlier batch of malt?  This is possible.  Bappir could be stored for relatively long periods and seems to have been a way of preserving grain for future use.

Another question is why the stuff Miguel Civil translates as "sweetwort" appears to be something Ninkasi can hold in her hands, when wort is a liquid.  Is this just a poetic metaphor?  Is she squeezing the grain/bappir residue to extract as much wort as possible?  It's hard to tell exactly what's going on here.

According to Miguel Civil, the honey mentioned in the hymn is likely to be date honey, while the wine could be either wine, grapes, or raisins.  If it is meant to be grapes or raisins, this may be how the Sumerians introduced yeast to their wort; yeast grows naturally on the skin of grapes.

Exactly how long should the beer be allowed to ferment?  Well, I think the hymn gives us an answer when it says the fermenting vat makes a pleasant sound.  Beers and wines make an audible bubbling noise during primary fermentation.  When you can no longer hear bubbling, the primary fermentation is complete.  I suggest the hymn is telling us, in its poetic way, that the beer was ready to drink after primary fermentation had finished.

The key problem with interpreting the Hymn to Ninkasi is that in order to understand it we have to filter it through modern knowledge about how the brewing process works.  The Sumerians did not have a modern understanding of the science behind brewing so there's no guarantee that what makes sense to a modern researcher bears any resemblance to what the Sumerians actually did.  In some ways the Hymn to Ninkasi raises more questions than it answers, but there's enough there to have a crack at brewing some Sumerian beer and a number of researchers have done so.  There are modernized recipes based on the Hymn available here courtesy of Brew Your Own, and here courtesy of the Maltose Falcons.

Note that these modern recipes include rice hulls.  Brewers add rice hulls to their mash to prevent it getting sticky and clumpy, but rice did not grow in ancient Sumeria.  We don't know what, if anything, the Sumerians used instead.  A potential answer lies in the fact that bappir was not eaten on its own, except during famines.  This possibly (though not necessarily) indicates the bappir was unpalatable.  If that's the case, I suspect bappir contained barley husks as well as the grain itself.

Some researchers question whether Sumerian beer contained alcohol.  Personally I'm inclined to think the question is more how much alcohol it contained; remember the hymn specifically says the fermenting vat makes a pleasant sound.  In other words, something is definitely fermenting in there.  But exactly how much alcohol the beer contained is open to question and different types of beer may have differed in strength.  I have a hydrometer now, so I can put this to the test when I make my Sumerian beer.  At a guess I'd say it will be comparable to modern commercial beers - about 5% alcohol by volume, however the inclusion of date honey means it would theoretically be possible to make a brew with a higher alcohol percentage.

In the next post I'll share the practical results of all this theory!


* D.T. Potts. 1997.  Mesopotamian Civilisation: The Material Foundations.  London: The Athlone Press.

Sunday, 13 March 2016

The Phaistos helmet reconstruction - complete

There you have it folks, my reconstruction of a 16th century BCE Minoan helmet.


Here it is with the original Phaistos helmet for comparison


My objective was to make a helmet that is as close as possible to what the Minoans actually used, based on what we know about helmets in the bronze age.  How historically accurate is my reconstruction?  Overall this was quite a successful project and the final product does successfully recreate the Phaistos helmet.  Where I've had to make assumptions, I'm fairly confident that they are plausible and reasonable.    As far as possible I've used materials and technique that were available to the Minoans, with the exception of three little cheats: metal components made out of modern ferrous alloy, modern dyes for the felt, and modern steel tools.  In this blog post I'll talk about some of the decisions I made and why I made them.

Because these helmets were made from perishable materials there are no surviving examples.  There are depictions of beehive helmets in Minoan and Mycenaean art, but these are small, often fairly stylized, and can be interpreted in a number of different ways.

Some of the most detailed depictions of beehive helmets in ancient art show boars' tusk helmets of the kind Homer described.  These sculptures show helmets that were constructed around a framework of leather strips, and I've constructed mine the same way.  The difference is that instead of boars' tusks my helmet has an outer shell of leather plates.


From the front


From the side


From the inside.  The felt lining is what Homer called a πίλός (pilos).


Because of the lack of direct archaeological evidence I've had to make some assumptions, and to some extent this project has been about testing those assumptions.  Using felt to cover the joins in the outer layer of the helmet was an assumption based on the fact that it's well suited to the task, and we know that felt was used to line helmets.   While it would have been possible to use leather I think the felt did a better job and was easier to work with, so that assumption worked fairly well.  The felt lining inside the helmet makes it more comfortable to wear, but on the outside it's mainly decorative.  It's there to cover the join lines between the leather plates.

My decision to make the outer shell of the helmet in four parts was also an assumption.   I don't know if the Minoans would have had a way to make the outside of a helmet in one piece, but that wasn't possible with the leather I used.

The fact that Aegean beehive helmets were usually made from perishable materials is fairly conclusively established*, but exactly what materials were used and how they were used is less clear.  Based on archaeological finds of metal reinforcement discs we know that this style of helmet was made from either leather or some type of textile with metal discs attached to it to enhance its protective qualities.   Leather is a reasonable guess, but it's also possible these helmets could have been made from linen.  Probably many layers of linen glued together much like a linothorax.   Some bronze age images show helmets with horizontal ridges that I think may perhaps represent thick rolls of glued linen.  In the future I'd like to try making a linen helmet to see how it works out.


From the top you can see the concentric leather rings that make up the outside of the helmet.


What kind of protection would this helmet offer?  

I have to admit that after spending between 20 and 30 hours making this thing I don’t particularly want to take it down the firing range and shoot at it.  However, it would be easy enough to make a test patch and I can already make some observations about the helmet’s protective qualities.

At its thinnest point, the helmet is 20mm thick.  This includes two layers of 5mm armour leather plus two layers of wool felt.  At its crown the helmet is a good two inches thick, with many layers of leather strips.  It weighs 1.4 kilograms, which is equivalent to a lightweight motorcycle helmet.

I’m inclined to think the primary purpose of a helmet like this was to prevent blunt force trauma.  It’s made from thick layers of flexible materials that can absorb the kinetic energy of an impact, and it offers as much protection as possible to the crown of the head.  The thick leather reinforced with metal studs would be relatively difficult to penetrate with a sword or arrow, but the construction as a whole seems designed to absorb the kinetic energy of an impact rather than to provide the kind of solid barrier that plate armour does. In this respect it's a lot like a linothorax.

Would I be happy to let someone hit me over the head while wearing this helmet?  Yes.  Yes I would.


*  Helmets made entirely out of metal did exist in the bronze age, but were unusual.  Even the famous Dendra Panoply did not come with a metal helmet.  Its owner apparently preferred a boars' tusk helmet.

Wednesday, 24 February 2016

Inside the Phaistos helmet

The Phaistos helmet has a double border running around the edges of the neck and cheek guards.  It's hard to tell for sure what this feature represents, but I believe it's a piece of felt sewn onto the inside of the helmet as padding and then folded over to the outside to create a decorative edge.

Double border around the neck and cheek guards.  The border extends to the edge of each piece and appears to be slightly raised.

This is not the only way to interpret the double border, but it is consistent with the fact that beehive helmets were lined in felt.  Homer uses the word πιλος (pilos) to describe a cap made out of felt which formed the lining of a helmet.  Later on, the word came to mean a helmet in Classical Greek.  Thucydides calls the Spartans' helmets πιλοι (piloi), but in reality they were probably made of bronze.  They were beehive shaped though.


Decorative border around the neck and cheek guards of my helmet.


In my very first post on the beehive helmet, I discussed the parallels between bronze age Aegean helmets and today's motorcycle helmets.  The pilos is equivalent to the foam padding inside a motorcycle helmet that makes it comfortable to wear.  My Phaistos helmet is a hell of a lot more comfortable with a pilos inside, and because this is very thick felt it does provide a little extra protection.


The inside of my helmet, fully lined.


These next photos show how I made the double border around the cheek and neck guards.  There's a piece of felt on the inside of each guard, and it is folded over the edge of the leather.  Then I've stitched right through both the leather and the felt to keep everything in place.  A second strip of felt is stitched in place to create a border with two blue ridges.

Felt is ideal for this process because it can be stretched and folded around corners, and unlike woven textiles it will not fray.


In this photo I'm starting to sew felt to the inside of the cheek guard.


In this photo I've finished sewing felt to the inside of the cheek guard and I'm finishing the decorative edging.


The stitching is done with heavy linen thread and goes right through both the leather and the felt lining.

Saturday, 6 February 2016

A little bit of fun

This fortnight's Historical Food Challenge is History Detective - "For this challenge, you get to be the detective! Either use clues from multiple recipes to make a composite recipe, or choose a very vague recipe and investigate how it was made".

Since it is barbecue season in this hemisphere I've researched ingredients known from Linear B texts and come up with two marinade recipes for grilled meat.  We know the Mycenaeans enjoyed grilled meat, and while we can't conclusively say whether they used marinades it's not an unreasonable assumption.


Beef with saffron and coriander, and lamb with mint and cumin.


We don't have any recipes from Mycenaean Greece, which is deeply unfortunate because they probably had quite a sophisticated cuisine.  We do know a bit about the kinds of food they ate, partly from archaeological remains, and partly because a lot of food products were recorded on Linear B tablets.  The staple food was grain, and workers were paid in grain; they might also get olive oil and figs.  There were a wide variety of domestic animals including cattle, pigs, sheep, and goats, although meat may have been a special occasion food for many people.  The elite got to enjoy a range of exciting spices, and probably a range of cooking techniques*.

Grilling meat on skewers the way modern Greeks make souvlaki was apparently common practice in Greece during the Bronze Age, and the Mycenaeans had a unique type of portable grill which archaeologists call a souvlaki tray.

Personally, I find the term "souvlaki tray" a bit misleading, because the meat wouldn't have tasted anything like modern souvlaki.  Souvlaki is made with lemon, which was not available in Greece at that time, and oregano, which may or may not have been available but is not attested in Linear B.  Based on the spices listed on Linear B tablets I would expect Mycenaean food to incorporate flavours we now associate with the Middle East, like cumin, mint and coriander.


Recipe 1 is flavoured with saffron and coriander, and I found it worked very well with beef.


Recipe 2 includes mint and cumin.  I used it to marinade lamb, and I think it might also be nice with pork.


The sign shaped like a T usually refers to a unit of weight equal to about 3 kilograms, but as Dr Richard Vallance has discussed this depends on context.  When it refers to spices it represents a much smaller quantity.  In these cases Vallance translates it as a gram (about a quarter teaspoon).  I've used it to refer to grams here, and I've also used it to represent mililiters, since a mililiter of liquid weighs close to a gram.  Mycenaean scribes sometimes did use weight measurements for liquids.

So here are the recipes in English:

Recipe 1

100mls red wine
50mls olive oil
1 teaspoon ground coriander
1/2 teaspoon cumin
Around 20 saffron threads

Recipe 2

100mls red wine
50mls olive oil
2 teaspoons chopped mint
1/2 teaspoon cumin
1/4 teaspoon cardamom

Both recipes are made by simply combining the ingredients and marinading the meat for 4 hours or, ideally, overnight.  After that all you have to do is thread the pieces of meat onto skewers and barbecue them.


The Challenge: History Detective.

The Recipe: See above.

The Date/Year and Region: Greece, 1600 - 1100 BCE.

How Did You Make It: See above.  If you're unfamiliar with saffron, remember to soak the threads in a spoonful of warm water for a few minutes before adding them to your marinade.

Time to Complete: A few minutes to prepare, plus grilling and marinating time.  I suggest making the marinade the day before and leaving it overnight, especially with recipe 2.

Total Cost: $9 for a packet of saffron; all the other ingredients are ones I normally have in my kitchen.  In the Bronze Age, however, the saffron and other spices would have been eye-wateringly expensive.

How Successful Was It? Both recipes were very nice.  Recipe 1 is my favourite, but they're both good.

How Accurate Is It? As I said previously, these recipes represent my best guess as to what Mycenaean cooking might have been like.  It's an educated guess based on what we know about how the Mycenaeans prepared food and the ingredients they used, as well as my own experience of what makes a good marinade, but it is a guess.


* We know this because of the many types of specialised cooking vessel mentioned in Linear B tablets.  For more information see Lis, B. 2008.  "Cooked food in the Mycenaean feast - evidence from the cooking pots", published in Dais or available online here.

Monday, 1 February 2016

More beehive helmet

Yep, I've been doing a bit more work on the beehive helmet.  I now have the outer shell of the helmet fully assembled.  I've connected my outer helmet pieces together using strips of felt sewn to the edges of the leather bands.  The felt strips connect the leather bands together, and cover up the joins.


This is to some extent a matter of interpretation, but it's an educated guess based on what we know about beehive helmet construction.  If I was making a boars' tusk helmet I would place strips of felt behind each row of tusks, and fold the felt edges over the ends of the tusks to create a nice neat edge.  It's also possible to use thin leather for this step, but personally I prefer felt because it can be stretched and eased to fit the helmet's curves.  It's more difficult to do that with leather.

Another reason I think this stuff was felt, not leather, is that in Minoan paintings it is brightly coloured.  I'm not sure if it was possible to dye leather bright colours using bronze age techniques, but they could certainly dye wool.

Take a look at these warriors from one of the Akrotiri frescoes.  Although the figures are very small and not especially detailed, we can see blue stripes between the rows of boars' tusks on their helmets.  We can also see that the cowhide used to make their shields is not dyed, which makes me wonder if they perhaps didn't have effective processes for dying leather.  If anyone knows, please comment and enlighten me.

Picture from The Stream of Time.

I made the felt myself, because commercially produced felt doesn't have the right properties for a Minoan helmet. This is stiff, solid fabric about a quarter inch thick and quite different from what you can buy at a craft store.  I used to think the felt was largely decorative, but now I'm starting to think it may have provided some level of protection in its own right.  It turns out Thucydides and Pliny both mention felt as being arrow-resistant.

Tuesday, 19 January 2016

Farmhouse ale tasting notes

Last year I made a batch of ale, and now it's time to drink it.  But is it good?


Well, it's not the best beer I've ever had, but it's certainly not the worst*.  It's good enough to serve to guests and it got reasonably good reviews.  The taste is slightly sour with distinct citrus flavours, which is a flavour profile I enjoy and therefore a good result.  I do think the flavours could be a little more balanced, and I'll put some thought into how to improve my next batch.  Overall the flavour and colour are more or less in line with what you might expect from a mild ale.

One of the things that interested me about making raw ale was to see if it would taste different from boiled beer, but I don't think it does.  What is slightly different is the texture.

It has a smooth, full-bodied texture, and as you can probably see from the photo it's a little cloudy with some sediment in the bottom of the bottles.  While a bit of sediment is normal for home brewed beers and also for some commercial beers (e.g. Hefeweizen), this is cloudier than usual.  As it is a raw ale, that's to be expected.  When you boil your wort you destroy the protein in it, but raw ale still contains this protein.

My ale doesn't have much of a head, which is possibly because I didn't use carbonation drops.  I wanted to see how it would go without them.  As you can see from the photo there is plenty of carbonation in there, and I wonder whether this is a style of beer that doesn't froth up much.  Because I've never had raw ale before I don't really know what to expect, and this is very much a learning process for me.

I don't know what percentage of alcohol is in the beer either, because I don't own a hydrometer.  I keep meaning to get one, but really I'm more interested in the taste than the alcohol content.   Any fool can make alcohol, the important thing is whether it's palatable.  However, I can tell you that this stuff is probably not a standard 5% beer.  I think it's closer to 7%.

To make this beer I followed the brewing process used in Denmark in the 19th century, when it was still common for households to brew their own beer.  The process is described in detail in fairly extensive surveys, which are summarised by blogger and brewing enthusiast Lars Marius here.  It's actually a very simple process that doesn't require much in the way of equipment, which is attractive to me as a home brewer, and I'm a little surprised that more home brewers don't follow this method.  I recommend it.


* Disclaimer: I have drunk some impressively horrible beers in my time.

Monday, 4 January 2016

What are o-pa-wo-ta?

That picture again.

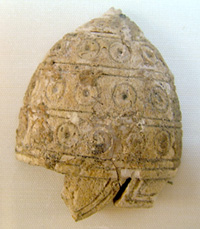
The Phaistos helmet has circular markings with little holes in the middle at regular intervals around the outside.  These are reinforcement discs, or o-pa-wo-ta in Linear B (έπαϝορτα) .  It means "attachments", and we know from Linear B archives that o-pa-wo-ta were used on both helmets and body armour to enhance the protective qualities of perishable materials such as leather and linen.  O-pa-wo-ta were made of bronze (possibly ivory or bone in some cases), and they gave extra protection against arrows and sword blows.  Very few bronze age helmets were made entirely of metal, but metal reinforcement pieces were a common design element right through the bronze age.  The Phaistos relief would have had metal discs that unfortunately haven't survived, and they would have been shaped like little nails with pins driven into the holes in the ivory piece.

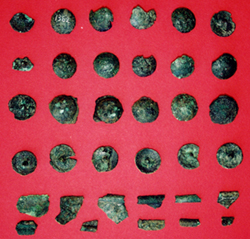
Reinforcement pieces on real helmets were either metal studs with pins that were hammered through the leather, or perforated discs stitched to the leather.  Archaeological evidence suggest both types were used, but for this project I'm going with metal studs similar to these late bronze age examples found at Lakkithra, which have a round, slightly domed head with a pin in the center.


Small bronze nails used to reinforce a helmet, found at Lakkithra.


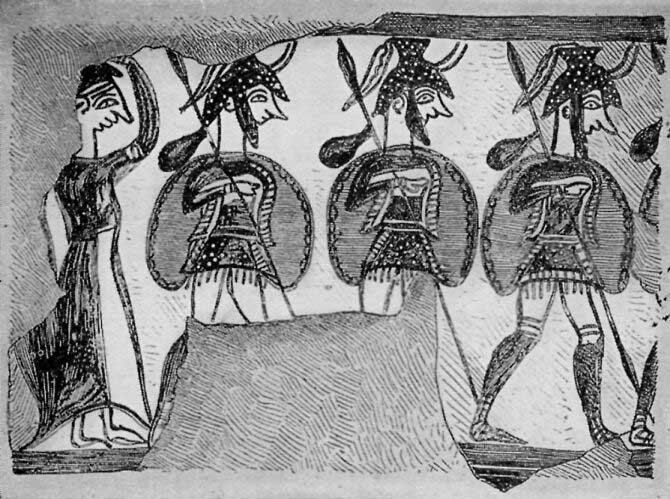
Bronze age art indicates o-pa-wo-ta came in all sizes, from relatively large ones on the Phaistos relief to tiny ones that look more like studs on a leather jacket on the Warrior Vase from Mycenae, made around 1200 BCE.  The white dots on these helmets represent o-pa-wo-ta.  Bearing in mind the fact that o-pa-wo-ta could also be used on body armour, the white dots on the warriors' kilts may also represent o-pa-wo-ta.


Picture found here.

These small o-pa-wo-ta scattered randomly over the surface of the helmet are a bit unusual.  Most depictions of bronze age helmets show the o-pa-wo-ta arranged in horizontal rows.

I should point out here that the circular markings on the Phaistos relief don't necessarily indicate what shape the metal discs were.  It's quite possible they were round with a small circle in the middle, but they may not have been.  Other art works suggest plain round discs like the ones from Lakkithra and some clearly show o-pa-wo-ta shaped like rosettes, which is why I was quite excited when I found some studs in the shape of little rosettes.


Those are furniture tacks.  They were described as "bronze" on the Ebay listing, but of course that refers to the colour.  I doubt they are actually bronze, but they do look about right.  As you can see they're a lot like the Lakkithra studs, apart from the embossed rosettes.  They have the same slightly domed head and central pin.  Even though they aren't quite the right metal, I'm very pleased with them.

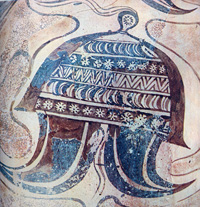
Studs in the shape of rosettes are shown on some pictures of helmets from this time, and rosettes in general were a common design in Minoan and Mycenaean art.  Many were very similar to the rosettes on my furniture tacks.


A Minoan helmet with rosette-shaped studs and what appear to be rows of boar tusks.


References for the Linear B tablets:

Chadwick, J., Killen, J. T., Olivier, J.P. 1971.  The Knossos Tablets (4th Edition).  Cambridge: Cambridge University Press.

Ventris, M., Chadwick, J.  1956.  Documents in Mycenaean Greek.  Cambridge: Cambridge University Press.

Sunday, 3 January 2016

Minoan beehive helmet: the outer layer

This is the third part of my beehive helmet series, in which I describe how I'm reconstructing a Minoan helmet like this one from Phaistos.  In part two, I talked about how I made the inside of the helmet.  This post deals with the outer layer.

Picture from the Salimbeti website


The outside of the helmet is made from four horizontal bands of leather, joined together with what are probably strips of felt.  Since the helmet is shaped, these leather bands have to be shaped too.  I can't really provide a pattern like I did for the internal structure, because the external layer's shape and dimensions depend on the internal support and will therefore be slightly different for every helmet.


Bands 1 to 4, clockwise from left.


Band 1 is simply a strip of leather 50mm wide and long enough to go around the helmet plus about 50mm.

Band 2 is also a strip of leather 50mm wide, but it has been stretched until it has a slight curve.  It started out 30mm longer than the circumference of the helmet, and after stretching the bottom edge of band 2 is 20mm longer than the top edge.  It's not much,  but it's enough.

Band 3 has more of a curve than I could achieve just by stretching the leather.  I could do it with thinner leather, but this stuff is thick and tough.  Therefore, I made a pattern by taping a piece of paper around the top of the helmet and drawing the band.  Once I cut the paper, I had a pattern I could use to cut out my leather.


Piece of paper wrapped around the helmet, with the shape of band 3 drawn on.

Pattern for band 3.

Band 4 is a circle 120mm in diameter with a 50mm hole cut out of the centre.  It is shaped into a shallow cone.

To shape the leather, I gave it a really good soak in hot water until it was thoroughly saturated (this takes an hour or so), then moulded and stretched it until it fit over the inner helmet.  I kept that dry by wrapping it in clingfilm.  No it's not historically accurate, but it gets the job done.  The inner helmet is nowhere hear rigid enough to be used as a mould for shaping the outer bands, so I just used my hands to shape bands 1 through 3, and found a wine bottle worked well for shaping band 4.  Maybe the Minoans used wine jars too.

Soaking the leather makes it a lot softer, but with leather this thick it still takes a little patience and a lot of brute force to shape the pieces.  The same goes for piercing holes to stitch the leather bands together and attach metal studs, which I'll discuss in more depth in the next post.

There are no words to describe how sick I am of making awl holes in armour leather.

The easiest way to do it is to soak the leather and then heat the awl over a candle, which I suspect was how the Minoans did it, but "easiest" is a relative term in this context.  It must have been even more difficult in the Bronze Age, because steel tools were not yet available.  The tools they had didn't hold an edge the way steel tools do.